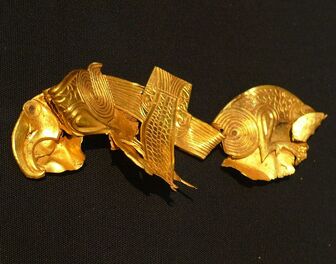
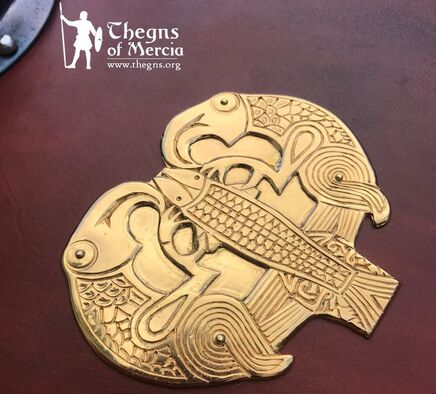
 "Eagle and fish" gold sheet fitting from the Stafforshire Hoard. (Source: Wikimedia Commons, CC 2.0).
 "Armed with the precedent set by the Sutton Hoo Mound 1 shield, pieces of possible shield-decoration from the Staffordshire Hoard, and current understanding of 7th century shield evolution, we embarked on a project to produce a shield that would not look out of place in the hands of Penda, Oswald, or one of their lieutenants. "
Nothing is more synonymous with Anglo-Saxon archaeology and history than the fabulous treasures which were uncovered in 1939 at Sutton Hoo, yet there is nothing “typical” or “representative” about the vast majority of this truly remarkable assemblage. The enormous highly decorated shield, for example, integrating hundreds of components, lacks any particularly appropriate English parallels, and its closest comparators come from similarly impressive burials from the roughly contemporaneous Vendel Culture in Eastern Sweden. So remarkable and “exotic” is the Sutton Hoo Mound 1 (SHM1) shield, that the still foremost study of Early Anglo-Saxon Shields; Dickinson & Härke (1992) all but excluded it from consideration. Anglo-Saxon shields with even modest metallic decoration (such as appliques or boss apex discs hardly visible except at very close quarters) are exquisitely rare and occur mainly from the mid 6th century; it is unclear to what extent this reflects a decline in the fashion or is simply an already rare item among furnished burials becoming invisible with the decline of the rite itself. Variation in the lavishness of shield ornamentation could be a battlefield indicator of rank and status, though most fittings are too small to have been particularly visible in this context, and although it is possible to sort the limited sample of decorated shields into “ranks” of embellishment (Dickinson (2005) and Mortimer (2011)) there is a danger of implying false near-equivalence between the only “top rank” shield of SHM1, and “second rank” shields (the most elaborate from the more commonly regarded “English sample”) such as 6th century Bidford-182 (see our reconstruction and article here) and the Tranmer House Shield (Sutton Hoo Grave 868), which are, in terms of crude count of components, at least 20 times less elaborate. Given extremely limited organic preservation, painted designs, wooden or leather appliques might be feasible, but the picture from grave archaeology is that, despite being the largest, most conspicuous “display surface”, even a high-status Anglo-Saxon warrior’s shield would have looked quite plain.
Contrary to this picture from undisturbed grave-shield finds, fragments of decoration from the robbed Sutton-Hoo Mound 2 (SHM2) equivalent to elements of the SHM1 shield suggest that the latter was not, in fact, unique, and the enormous abundance of jewelled 7th century “warrior bling” in the Staffordshire Hoard (STH / “the Hoard”) provides overwhelming evidence for conspicuous wealth and status display, in the form of jewelled war-gear, on the battlefields of the early-to-middle Anglo-Saxon period. The most senior battle-companions of the occupant of SHM1 (probably Raedwald – King of the East Angles) would likely be similarly bejewelled, and so would other 7th century kings particularly characters like Edwin and Oswald of Northumbria, and Penda of Mercia, who, through political manoeuvring and conquest would succeed Raedwald as notional holders of Anglian “imperium”; it is hard to imagine these warrior kings – wearers of bejewelled helmets and wielders of gold-hilted swords – not having similarly impressive shields.
Armed with the precedent set by the SHM1 shield, pieces of possible shield-decoration from the Staffordshire Hoard, and current understanding of 7th century shield evolution, we embarked on a project to produce a shield that would not look out of place in the hands of Penda, Oswald, or one of their lieutenants.
Armed with the precedent set by the SHM1 shield, pieces of possible shield-decoration from the Staffordshire Hoard, and current understanding of 7th century shield evolution, we embarked on a project to produce a shield that would not look out of place in the hands of Penda, Oswald, or one of their lieutenants.
The Iron Fittings
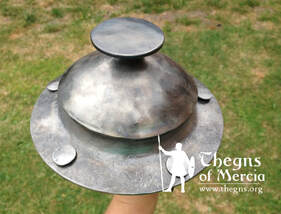 Low-domed, wide buttoned and flanged mid 6th century iron shield boss. (Replica by Jason Green / Wieland Forge). By the mid 7th century Anglo-Saxon shield-bosses had changed considerably.
 First came consideration of the shield’s iron fittings; the boss and grip-reinforcer. As an assemblage almost exclusively made up of precious metal fittings torn from larger objects, it almost goes without saying that the Hoard contains no shield bosses or grips, and it is by no means straightforward extrapolating what iron-fittings would have accompanied the later elements of the Hoard. It would not be appropriate to raid the rather “Vendel Culture” shield boss from the SHM1 shield with its deeply curved low dome, rather old-fashioned wide flange, and florid decoration; we were convinced this shield should integrate a more “English” and contemporary boss.
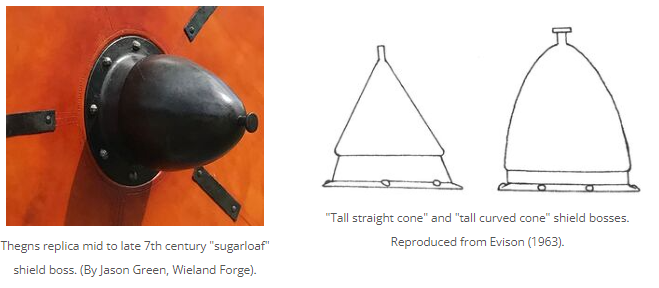
Earlier styles may still have been in partial use in the mid 7th century, especially in more remote (with respect to continental influence) territories like Mercia, but, at least according to waning grave archaeology, these decades saw a gradual shift from the classic “insular” styles of Anglo-Saxon shield bosses with their low domes and often broad apical buttons, to the tall “sugarloaf” style already popular on the continent, which would (at least according to limited iconography) dominate well into the late Anglo-Saxon period. Our ability to thoroughly examine this phase of shield evolution is limited, for it coincides with the twilight of the furnished burial rite. The still most comprehensive (though very much out-of-date) study on these later shields, Evison (1963) suffers from a degree of conflation between insular and true sugarloaf (later designated Dickinson Type 7 / Hines SB5) bosses, and importantly, its chronology is skewed (relative to modern understanding) having been written prior to the pivotal re-dating of the SHM1 burial and its gear, which had knock-on impacts on comparative dating of all other Anglo-Saxon archaeology.
The true, fully developed sugarloaf shield boss form (Evison’s “tall curved cone”, Hines SB5-b/c) appears to have gradually emerged via, or in tandem with a short-lived phase of tall but relatively straight-coned bosses (still within Dickinson’s Type 7, or Hines SB5) with relatively tall, straight, sloping walls and limited overhanging carination (Evison’s “Tall straight cone”, or Hines SB5-a), in the second to third quarter of the 7th century. Notable examples of this form come from Wenden and Melbourn (Cambs), Croydon (Surrey), Faversham (Kent), West Knoyle Farm Stourton (Wilts), a particularly tall-walled example from Bury St Edmunds (Suffolk), and (at least according to Evison) somewhat lower (transitional?) examples from Salisbury Race-Course, Coombe Bisset (Wilts) and the famous 16th grave of the cemetery at Mount Pleasant, Alton (Hants). With a relatively smooth continuity from “low” to “tall” bosses, sorting transitional examples (as noted by Evison) is an arbitrary business; a perhaps defining characteristic of tall sugarloaf bosses (as opposed to low insular bosses) given significant weight in the Hines (2013) analysis appears to be the number and shape of rivets, as sugarloaf bosses (including the tall-straight form) tend to be attached with small dome-headed rivets, often greater in number than the typical 4-5 larger disc-headed rivets of earlier boss types. Of course, especially given evidence for re-fitting of bosses, sorting and dating shield-bosses based mainly on the shape of their rivets could be unwise.
mportantly, the Coombe Bisset example was found with a garnet and shell cloisonné pyramid fitting (so-called “sword pyramid”) and the Alton case was found alongside a sword with cocked-hat pommel and hourglass grip collars, and the famous silver-gilt, garnet, and gold-filigree decorated buckle. The Bury St Edmunds and Melbourn examples were found with bronze buckles with folded back-plates secured by three small rivets (Bayliss and Hines BU7); a fashion of the 7th century found elsewhere in SHM17, and the Staffordshire Hoard. Indeed, of any, this relatively rare type of shield boss shows the greatest co-occurrence with items similar to those in the Hoard.
We therefore chose the “tall straight cone” shield-boss for this shield, taking the boss from Melbourn, Cambridgeshire, as our exemplar. As with previous shield projects, we turned to Jason Green of Wieland Forge to produce the boss for us.
Tall bosses are challenging, especially as limited data suggests they were similar in weight, to earlier (smaller) boss forms; the same mass stretched further to produce a thinner but steeper-sided boss which would encourage blows to glance rather than bite into the thinner walls. The boss Jason produced was exactly the shape we’d hoped for, and wonderfully light. To compliment this, again foregoing the rather “Vendel Culture” (and in an English context, retro) long grip and florid decoration of the SHM1 case, we made a simple Dickinson Type 1a(i) grip reinforcer (a slightly bow-tie shaped strap of iron, riveted at each end) – the simplest type, but the only one which commonly occurs with sugarloaf bosses (Dickinson & Härke, 1992).
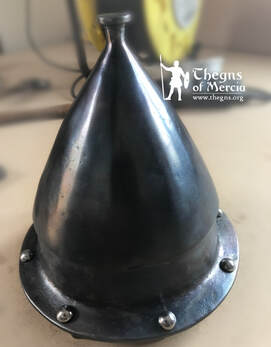
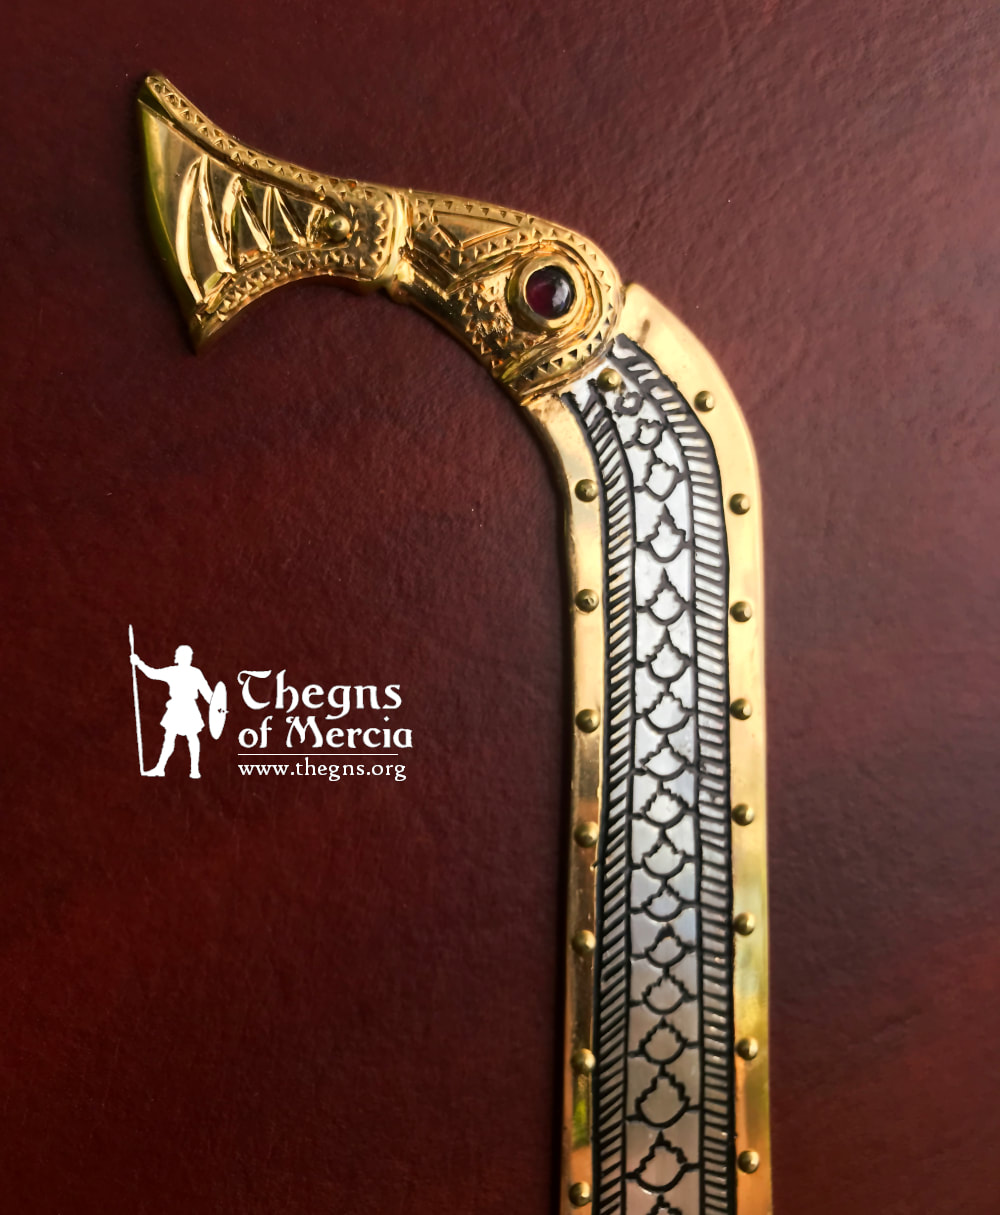
Reproduction of a mid 7th century "tall straight cone" sugarloaf shield boss, by Jason Green / Wieland Forge, ready for installation on the Staffordshire Hoard shield.
The Board
Another difficult aspect was the size of the board. The size of Anglo-Saxon shields is a contentious issue (discussed here), particularly due to misinterpretation of the otherwise invaluable data outlined in Dickinson and Harke (1992) concerning “maximum” and “minimum” shield sizes. The enormous SHM1 shield was around 92 cm in diameter (in line with ranges for the Vendel Culture analogues 0.84 to 1.1m), while the next largest – Ford 2 (with sugarloaf boss, and seax with silver fittings) was 90cm across; however the remainder of shields in Dickinson and Harke (1992) with probable board dimensions are considerably smaller than this, with the median of Anglo-Saxon grave shield max diameters (n=112) approximately 65cm. That said it is noted that shield boards appear to increase in size towards the end of the early period (ie. Into the 7th century) and therefore a board on the upper end of the evidenced range would be reasonable. From our own experience with replica shields, and our own size we have found 70-80 cm to be a respectable size for an average sized male, and (with one eye on the fittings we planned for it to comfortably frame) chose to make our new shield 77cm – not so enormous as the Sutton Hoo or Ford examples, but still well on the upper end of the evidenced range.
Another critical detail was the thickness and shape of the board. The SHM1 shield board was slightly dished at the edges, and was thinner at its edges than at the strap-holder (half way out from the boss), while another shield from Pewsey (grave 34) was at least 2 mm thinner at the edge than at the boss (from 7 to 5mm). The careful carving of these boards in this manner may be for weight management, with thinner edges both reducing overall weight, but also, if carved off the front edge, subtly shifting the centre of mass of the shield closer to the grip, and bringing the weight closer to the grip improving manoeuvrability. With the SHM1 shield, its slightly dished shape would place the grip-point actually forward of much of the board, thereby helping the carrier manage its considerable weight.
Our shield would not be so large, but following these precedents we carved down approximately the outer third of the board, on the front only, to an almost blade-thin edge which, after application of skin product, would reach approx. 5mm in total.
We also took care to slightly recess the shield-boss into the front of the board. If this was done, it would be almost impossible to detect archaeologically, but is one of the possible solutions for the problem identified by Dickinson and Härke (1992) of the sloping flanges of Anglo-Saxon bosses, which if mounted flat, leave a gap beneath. By carving a complimentary recess into the board prior to application of the skin-product layers, a tight fit is guaranteed, as well as a pleasingly smooth surface on the front of the board, from the iron flange to the board cover. This also brings the heaviest element of the shield – the iron boss (and therefore, along with it, the shield’s centre of mass) a couple of millimetres closer to the grip, making the shield less cumbersome.
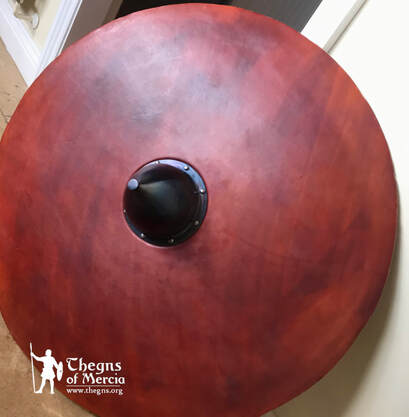
The "Staffordshire Hoard Shield" in progress; after application of the leather on both sides, installation of the boss, and polishing, but prior to installation of any rim or board surface fittings.
To both sides we applied 1.5-2mm thick veg tan bovine leather. Although Dickinson and Härke (1992) note some cases where only one side of the shield was covered, the majority of shields seem to have had skin product on both sides, which, presumably held on by a sturdy (yet archaeologically fugitive) glue, would form a 3-layer composite greatly increasing strength and durability. It is not clear to what extent skin product on shields was tanned, though the Sutton Hoo shield is described as being covered with “vegetable tanned cattle hide”. Modern veg-tan leather is a reasonable analogue, easily wet moulded around the now 3D shape of the board, and working well with our historic glue of choice; hide glue (this oldest of glues made from the collagen of animal connective tissues, would be indistinguishable from the collagen present in the skin product). Modern veg-tan is, however, typically pale and anaemic compared to more tannin-saturated historic leather of other periods and therefore not representative of the aesthetic likely seen on Anglo-Saxon shields. We use a modern dye blend on such items carefully chosen to mimic the warm hues of tannin-saturated historic leathers. Although this is an attempt to simulate the (probable) look of their tanning process, dyed leather was not unknown to the 7th-8th century Anglo-Saxons, as evidenced by the binding of the famous Stonyhurst / Cuthbert Gospel, of rich red-coloured tanned goatskin (probably imported). We followed this with much polishing, using our own blend of pure beeswax and raw neatsfoot oil (rendered fat from cattle) – both substances available to the Anglo-Saxons, which serve to condition, waterproof and provide shine to the leather surface.
The Grip, and Assembly
Grips for Anglo-Saxon shields were formed in various ways; most commonly a piece of wood was lap-jointed in some manner (most commonly off-centre) spanning a pre-cut hole in the board with the joints reinforced with rivets; the iron element which typically survives, attached by those same rivets, is merely to reinforce the structure. Our own preference, however, is for an approach Dickinson termed “Type D”; forming the grip from the board wood, or rather, cutting two unequal lunate holes rather than one circular one, with the (off-centre) bridge between forming the basis of the grip. This approach is evidenced, accounting for approx 20% of cases, and is associated with slightly higher burial wealth among a sample which excludes Sutton Hoo (Dickinson and Harke, 1992). This grip was carved such as to be rounded on the front face to fill the hand, and wrapped tightly with a strip of leather; an approach seen on various finds including, importantly, preserved texture of binding on the grip reinforcer with the tall-straight sugarloaf boss from Melbourn. Shield grips were often off-centre, as this produces a more ergonomic and comfortable result; more space is needed for the back of the hand than for the fingertips (for archaeological examples see Dickinson & Harke, 1992).
The boss was installed with eight small dome-headed rivets, shined up to contrast with the forge-blued surface of the boss. Although far plainer than the Sutton Hoo shield boss, or more typically “Anglo-Saxon” bosses from the 6th century, we were keen not to spoil Jason’s precise work by embellishing it beyond what is evidenced for its type. The Melbourn boss, according to one old report, had silver rivets, though this has not been confirmed, and the contrasting iron seen here is a small but conservative gesture towards that aesthetic.
The boss was installed with eight small dome-headed rivets, shined up to contrast with the forge-blued surface of the boss. Although far plainer than the Sutton Hoo shield boss, or more typically “Anglo-Saxon” bosses from the 6th century, we were keen not to spoil Jason’s precise work by embellishing it beyond what is evidenced for its type. The Melbourn boss, according to one old report, had silver rivets, though this has not been confirmed, and the contrasting iron seen here is a small but conservative gesture towards that aesthetic.

The Rim
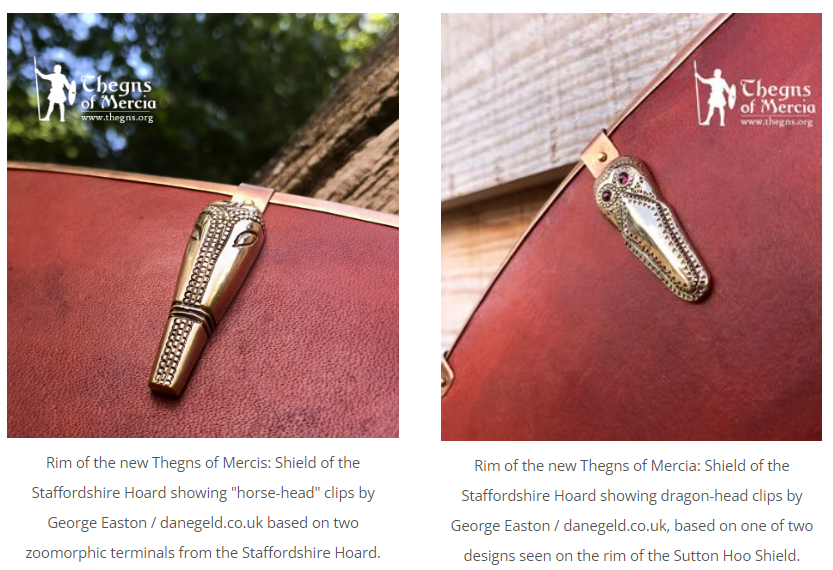
All previous shields we have produced have included a simple stitched leather rim, yet our only surviving example of a kingly Anglo-Saxon shield (SHM1) had a rim formed of U-section bronze strips held in place by riveted clips, with decorative terminals (of three kinds; interlace-decorated rectangular plaques, and two different designs of dragon-head). Small fragments of metal edge-binding and clips have shown up elsewhere, though most are unlikely to represent entire rims. That said, such rims appear on at least one Vendel Culture shield, and on shields from earlier but culturally associated bog deposits including Nydam. We were keen to reproduce this element, with a Staffordshire Hoard “spin”, and member Dr Andrew Thompson began work on forming 2.45m of U-section bronze edging, with Æd grinding each piece smooth by hand. It is fair to say we greatly underestimated the amount of sometimes very uncomfortable work involved in this, and have perhaps gained insight into why this feature was so rare.
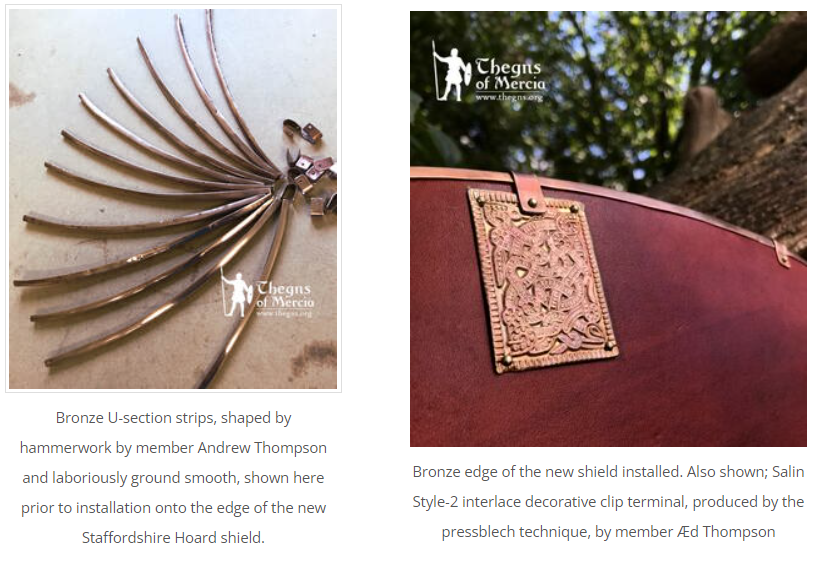
Given the size of the board we decided on 12 decorated clips; four with rectangular plates (in this case made by pressblech) with Salin Style-2 interlace designs of a kind represented among the countless foil fragments from both Sutton Hoo and the Staffordshire Hoard, four with wyrm-heads with garnet cabochon eyes borrowed from one of the two designs seen on the Sutton Hoo shield (produced for us by George Easton / danegeld.co.uk) and four adapted from the so-called “horse head” terminals from the Staffordshire Hoard (STH 678 et al). These terminals, though commonly referred to as "horses", could in fact be a different style of dragon-representation or even boar - the latter typically only distinguishable from other beast terminals by the presence of tusks. If they do indeed represent horses, they would be the first representation of this animal on Anglo-Saxon war-gear outside of pressblech foils. We have discussed the significance of horses in this context previously, here (link).
The Eagle and the Fish
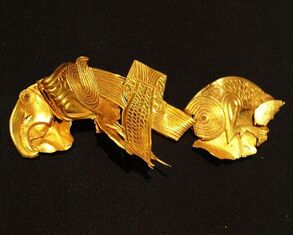
Finally, we came to the board fittings. The Staffordshire Hoard contains a number of fittings which could conceivably have come from a shield, and yet due to the lack of context which typifies this find, will likely forever be described with that so usefully ambiguous archaeological term “mount”. One such item, the so-called “Eagles and Fish” fitting was identified as possibly having come from a shield early in the Hoard’s story, and this remains one of the best interpretations for it. It was fabricated from multiple pieces of gold sheet, yet had been wrenched from its mounting, and twisted and folded deliberately before deposition, rather like the processionary cross.
Previous interpretations of this item (such as a replica shield produced early-on for exhibitions at Tamworth Castle) have placed it with the fish upwards, and birds divided by a vertical line of symmetry, yet when placed horizontally it appears not as two birds, but a single bird catching a fish at the water’s surface, with the reflection of both below the waterline. An additional pair of tiny stylised birds facing the same direction at the rear of the fish could be conceptualised as reflections of the bird in the turbulence created by the fish's fins. It is interesting to note that this one piece, if indeed shield ornamentation, spans and brings together the two best represented classes of zoomorphic shield appliques; those (like Mill Hill, Shelford, or SHM1) which depict birds of prey, and those (like Sheffields Hill, Barnes, or Eriswell) which represent fish. These motifs meet, as separate pieces, on the Tranmer House cemetery shield (Sutton Hoo Grave 868). The juxtaposition of birds and fish on shields, it has been suggested, represent binary concepts; sky and water, above and below; life and death. This is arguably brought into its sharpest relief with this unique piece from the Hoard with its vivid depiction of the waterline as veil between worlds.
In this context the bird; probably a white-tailed sea eagle (Earn) one of the three Wodanic beasts of battle, pulls its catch through the boundary between worlds, from its living world to its death; perhaps symbolising the harvesting of heroes by Woden. The placement of this object on the original shield board was, perhaps, a symbolic reminder that in battle, the veil between the world of the living and the dead was the shield itself.
In this context the bird; probably a white-tailed sea eagle (Earn) one of the three Wodanic beasts of battle, pulls its catch through the boundary between worlds, from its living world to its death; perhaps symbolising the harvesting of heroes by Woden. The placement of this object on the original shield board was, perhaps, a symbolic reminder that in battle, the veil between the world of the living and the dead was the shield itself.
Faithful replica (by George Easton, danegeld.co.uk) of the gold sheet bird-and-fish fitting from the Staffordshire Hoard, installed on our new Thegns of Mercia "Shield of the Staffordshire Hoard".
While the meaning of such items would normally be a matter of pure speculation, the Hoard analysts (publication pending) have discovered that the head of the fish was deliberately and precisely broken off in antiquity, perhaps to “dis-empower” the motif. If so, this would support Tania Dickinson’s thesis that animal art on shields represented symbols of superstitious / apotropaic protection for their wielders (Dickinson, 2005).
George produced a wonderful replica of this piece for us, and with it still falling into the category of “bird fitting” we, following the precedent set by the SHM1 shield, placed it on the right side, with the birds facing inward.
George produced a wonderful replica of this piece for us, and with it still falling into the category of “bird fitting” we, following the precedent set by the SHM1 shield, placed it on the right side, with the birds facing inward.
The Wyrm
Another fitting made of thin sheet surfaced later in the Hoard’s story, for it was pieced together from many small fragments, by the Hoard conservators, and only unveiled a couple of years after the discovery was first made. This long slender piece has a golden (or gilded) border perforated with many rivet holes, while its core is filled with a deeply dug silver-niello design clearly conceived to mimic the patterns seen in garnet cloisonné. It is, at least superficially, reminiscent of the “tauscheringwork” which became fashionable in the Frankish sphere of influence in the mid 7th to 8th centuries, including wire inlays into blackened iron in patterns often mimicking cloisonné; perhaps a compensation for a collapse in the gold supply. This piece is actually that effect “in negative”; shapes of silver picked out with thin black detailing rather than the reverse, and with its ends broken, this slender piece has defied interpretation; we are aware of little comment on what it might have been, and tentatively, with awareness that the publication of the Hoard research looms, we offer this interpretation.
The frequently placed attachment holes along the whole length of the slender body of the piece are reminiscent of another, familiar piece of similar form though quite different decoration, and close examination reveals that some of the dome-headed pins are still in situ, appearing perhaps a shield-thickness, in length. Like this Hoard piece, the Sutton Hoo shield’s wyrm fitting features a gradually tapering, narrow body, with frequently placed small dome-headed pins along its borders, and a central field formed of decorated sheet runs up the middle of the tapering body. The tail is crimped, widening again to a fin, like the more crudely shaped triangular tail fin of the Hoard piece, and the fearsome head is attached by a narrow, easily broken or mangled neck; could a head have once sat on those silver-niello shoulders, to be
deliberately broken off to “remove its power”, just like the fish mentioned above, or even the lone dragon-head of Sutton Hoo Mound 2?
The fiery-dragon, serpent or wyrm, like the eagle, symbolises death; both in the form of the devouring-fire of the funeral-pyre and the burial mound, which it guards and which is described in Beowulf.
Hē gesēcean sceall hord on hrūsan þǣr hē hǣðen gold warað wintrum frōd·
“He is doomed to seek hoards in the ground, where he, old in winters, defends the heathen gold.”
Beowulf, 2275-6.
As the final fitting for the shield, George produced for us a spectacular reproduction of the item pieced back together from the many Hoard fragments, integrating the fierce dragon-head from the Sutton-Hoo fitting, to, possibly for the first time in 1300 years, complete this beast. We nervously installed it, with its 47 pins, into the shield board, in the same position that its East Anglian cousin sat on the shield from Sutton Hoo.
 Reproduction of incomplete and previously unidentified Staffordshire Hoard "jigsaw" fitting (by George Easton / danegeld.co,uk) reconstructed here with the addition of a dragon-head (borrowed from the analogous Sutton Hoo mound 1 shield mount). We believe this comes close to its original form, and that this was indeed a shield fitting. Shown here mounted on the Thegns of Mercia "Shield of the Staffordshire Hoard". | 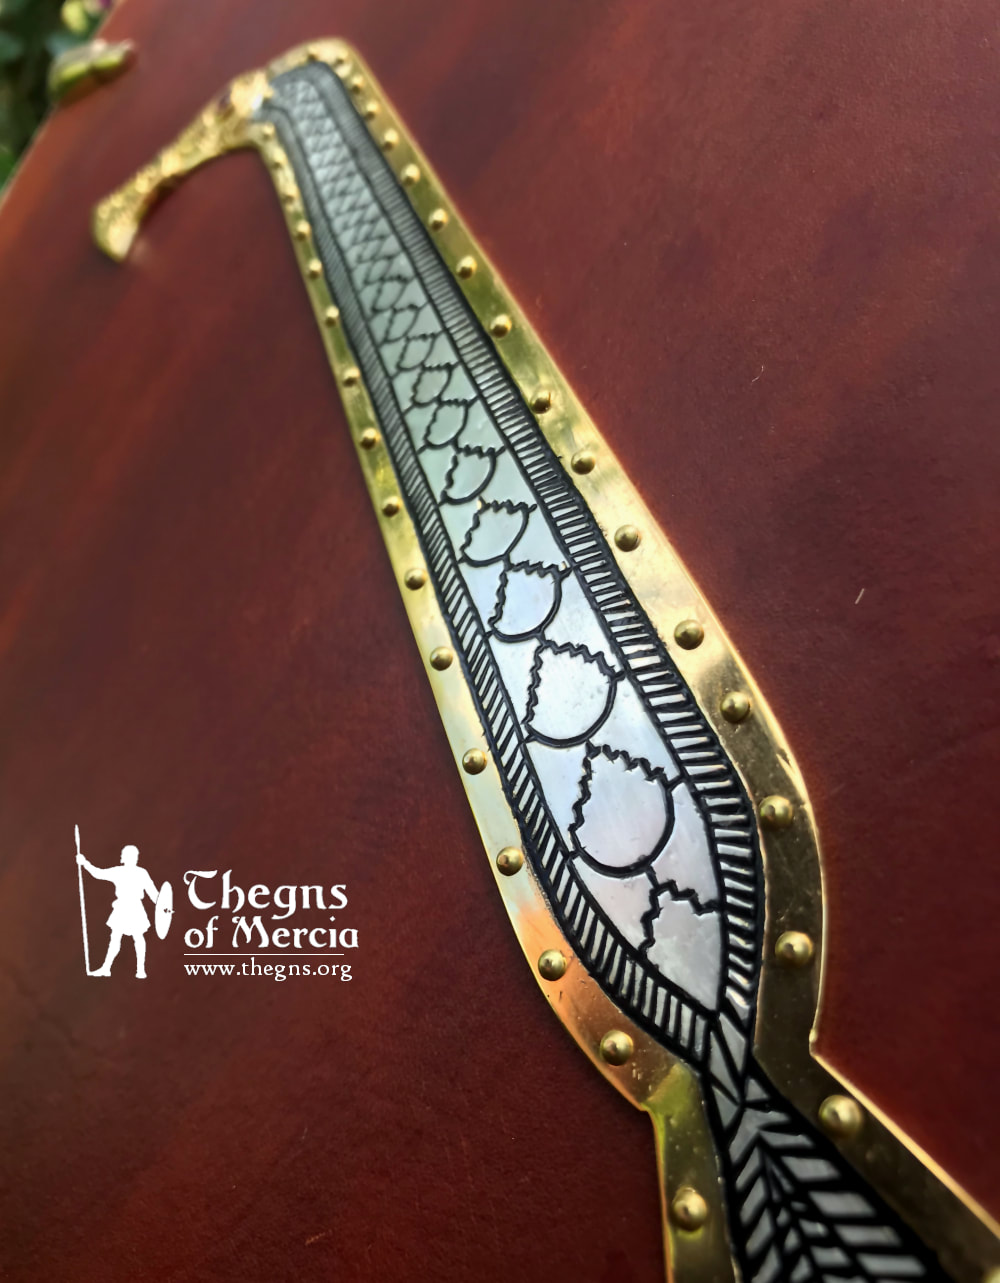 Reproduction of previously unidentified and incomplete gold and silver-niello "jigsaw" strip fitting from the Staffordshire Hoard, reproduced by George Easton / Danegeld and installed on the Thegns of Mercia "Shield of the Staffordshire Hoard". |
Conclusion
This shield, at least in terms of physical size, represents our largest "treasure reconstruction" to date, and is the culmination of months of work, and two years of collaboration with our associate craftspeople.
Integrating a total of 10 individual zoomorphic elements and a bronze rim, but a conservative mid 7th century boss and grip, this build is, we hope, representative of the kind of shield that may have been carried into battle by the warrior elites who wore the Staffordshire Hoard.
Integrating a total of 10 individual zoomorphic elements and a bronze rim, but a conservative mid 7th century boss and grip, this build is, we hope, representative of the kind of shield that may have been carried into battle by the warrior elites who wore the Staffordshire Hoard.
References
Bayliss, A., 2017. Anglo-Saxon graves and grave goods of the 6th and 7th centuries AD: a chronological framework. Routledge.
Bruce, S.G., 2015. The St. Cuthbert Gospel: Studies on the Insular Manuscript of the Gospel of John (BL, Additional MS 89000).
Dickinson, T.M. and Härke, H., 1992. Early Anglo-Saxon Shields (Vol. 110). London: Society of Antiquaries of London.
Dickinson, T.M., 2005. Symbols of protection: The significance of animal-ornamented shields in early Anglo-Saxon England. Medieval Archaeology, 49(1), pp.109-163.
Ellis Davidson, H.R. Gods and Myths of Northern Europe
Evison, V.I., 1963. Sugar-loaf shield bosses. The Antiquaries Journal, 43(1), pp.38-96.
Fern, C. 2014. "Dramatic golden fish and eagle: A link to Anglo Saxon kings?", [Online: Video]. History West Midlands, IDM Media production. Youtube. [URL: https://www.youtube.com/watch?v=QsYzrmO3jn8 ]
John Hines., 2013. Anglo-Saxon Graves and Grave Goods of the 6th and 7th Centuries AD: A Chronological Framework [data-set]. York: Archaeology Data Service [distributor] https://doi.org/10.5284/1018290
Mortimer, P., 2011. Woden’s Warriors. Warriors and Warfare in 6th-7th Century Northern.
Stephenson, I.P., 2002. The Anglo-Saxon Shield. Tempus.
Checked 09/03/2024
 RSS Feed
